

How To Change A Gas Tant On 1995 Corola
Toyota Corolla Repair Manual: Removal & installation and disassembly & re
1. Remove demote type rear seat cushion assy (, 72�viii)
2. Remove rear floor service pigsty comprehend
iii. Work for preventing gasoline from spilling out
- beginning the engine.
- after the engine has stopped on the its own, plow the ignition switch to lock.
4. Disconnect fuel tank principal tube sub�assy
5. Disconnect fuel emission tube sub�assy no.1
6. Remove fuel tank vent tube prepare plate
7. Remove fuel pump assembly
8. Remove fuel suction tube prepare gasket
9. Bleed fuel
10. Remove flooring panel brace front
- Remove the ii nuts and floor panel brace front end.
11. Remove frazzle pipe assy front
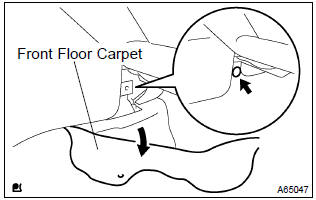
- Using a prune remover, remove the prune.
- tear off the front end floor rug.
- Disconnect the oxygen sensor connector.
- remove the 2 exhaust pipage supports.
- remove the iv bolts, four compression springs and frazzle pipe.
12. Remove fuel tank protector no.1

- Remove the 5 bolts and fuel tank protector.
13. Carve up parking restriction cable assy no.two
- Remove the ii installing bolts of the parking restriction cable.
14. Separate parking brake cable assy no.three
- Remove the 2 installing bolts of the parking brake cable
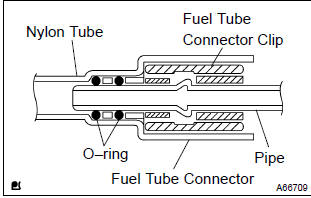
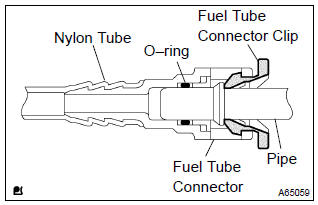
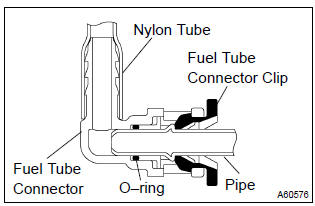
fifteen. Disconnect fuel tank main tube sub�assy
- Pinch the fuel tube connector prune, and remove the fuel tube connector clip.
- pull out the fuel tank main tube.
Discover
:
- bank check if at that place is any dirt like mud effectually the fuel tube connector before this piece of work and clean the dirt away.
- Be careful of dirt like mud because the fuel tube connector has an o�ring to seal the fuel tube connector and pipage.
- Do not utilize whatsoever tool in this work.
- Exercise not bend or twist the nylon tube by force.
- After disconnecting, cover the fuel tube connector with a vinyl pocketbook.
- When the fuel tube connector and pipage are stuck, pinch the fuel tank main tube betwixt fingers, and plow information technology carefully to complimentary and then disconnect the fuel tank chief tube.
xvi. Disconnect fuel tank inlet pipe fuel hose
- Disconnect the fuel tank inlet filler piping hose from the fuel tank.
17. Disconnect fuel tank sabbatical hose
- Disconnect the fuel tank breather hose from the fuel tank.
18. Disconnect fuel tank vent hose

- Disconnect the fuel tank bent hose from the charcoal canister.
- Button the connector deep inside.
- Pinch portion a.
- Pull out the connector.
19. Disconnect valve to fuel filler pipe hose
- Disconnect the valve to fuel filler pipe hose from the fuel tank inlet pipe.
20. Disconnect fuel emission tube sub�assy no.one
- Pinch the fuel tube connector clip and then pull out the fuel emission tube.
Discover
:
- bank check if there is any dirt like mud around the fuel tube connector before this work and clean the dirt away.
- Exist careful of dirt like mud because the fuel tube connector has an o�band to seal the fuel tube connector and pipe.
- Do not use any tool in this work.
- Do not bend or twist the nylon tube past force.
- After disconnecting, cover the fuel tube connector with a vinyl purse.
- When the fuel tube connector and pipe are stuck, pinch the fuel emission tube between fingers, and turn information technology advisedly to gratis and and so disconnect the fuel emission tube.
21. Remove fuel tank assy
- Set a mission jack to the fuel tank.
- remove the 4 bolts, 2 fuel tank bands and fuel tank.
22. Remove fuel tank master tube sub�assy
- Remove the fuel tank main tube from the fuel tube clamp and bracket
23. Remove fuel tube clamp no.four
- Remove the bolt and fuel tank clamp.
24. Remove fuel tube bracket
- Remove the fuel tube bracket from the fuel tank.
25. Remove fuel emission tube sub�assy no.1
- Pinch the fuel tube connector clip and then pull out the fuel emission tube.
Detect
:
- check if there is whatsoever dirt like mud around the fuel tube connector earlier this work and clean the dirt away.
- Exist careful of dirt like mud considering the fuel tube connector has an o�ring to seal the fuel tube connector and pipe.
- Do non utilize any tool in this work.
- Do not bend or twist the nylon tube by force.
- Afterwards disconnecting, cover the fuel tube connector with a vinyl pocketbook.
- When the fuel tube connector and pipe are stuck, pinch the fuel emission tube between fingers, and turn it carefully to gratis so disconnect the fuel emission tube.
26. Remove fuel tube clamp no.2
- Remove the fuel tube clamp from the fuel tank.
27. Remove bank check valve protector
- Using a screwdriver, unlock the hook, and remove the bank check valve protector by turning it counter clockwise.
28. Remove fuel tank inlet valve assy
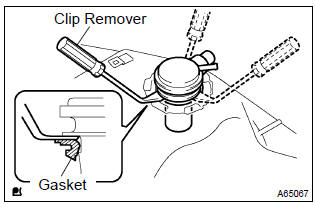
- Insert a prune remover between the fuel tank inlet valve and gasket, remove the fuel tank inlet valve by gradually pushing it up.
Notice
:
- work accurately to maintain the sealing performance of the fuel tank inlet valve, since it is fabricated from resin.
- It is easy to harm by removing and installing forcibly.
- Be sure to install a new fuel tank inlet valve and gasket.
29. Remove check valve gasket
- Remove the gasket from the fuel tank inlet valve.
30. Remove fuel tank cushion no.1
- Remove the 7 fuel tank cushions from the fuel tank.
31. Install fuel tank cushion no.1

- Install the seven new fuel tank cushions to the fuel tank.
32. Install check valve gasket
- Install a new gasket to the fuel tank.
33. Install fuel tank inlet valve assy
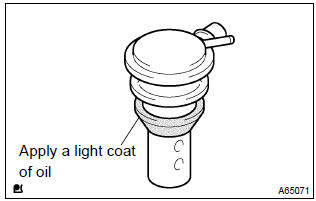
- Apply a light glaze of oil around the fuel tank inlet valve equally shown in the analogy, and insert it into the fuel tank without force.
Notice
: be careful non to drop the gasket into the fuel tank.
34. Install fuel emission tube sub�assy no.one
- Button in the fuel tube connector to the piping until fuel tube connector makes �click� sound.
Find
:
- check if there is whatever harm or strange objects on the connected part.
- After connecting, check if the fuel tube connector and pipage are securely connected by pulling them.
35. Install fuel tube clamp no.4
- Install the fuel tube clamp with the bolt.
Torque: 6.0 Nvm (61 kgfvcm, 53 in.Vlbf)
36. Install fuel tank assy
- Set a mission jack to the fuel tank.
- install the fuel tank and 2 fuel tank bands with the iv bolts.
Torque: 39 nvm (400 kgfvcm, 29 ftvlbf)
37. Connect fuel emission tube sub�assy no.1
- Push button in the fuel tube connector to the pipe until fuel tube connector makes �click� sound.
Notice
:
- check if there is any impairment or foreign objects on the connected part.
- Later on connecting, cheque if the fuel tube connector and piping are securely continued by pulling them.
38. Connect fuel tank main tube sub�assy
- Push in the fuel tube connector to pipe until fuel tube connector, and install the fuel tube connector clip.
Notice
:
- check if in that location is whatever damage or foreign objects on the continued part.
- Afterwards connecting, check if the fuel tube connector and pipe are securely connected by pulling them.
39. Install parking brake cable assy no.3
- Install the parking restriction cable with the ii bolts.
Torque: v.four Nvm (55 kgfvcm, 48 in.Vlbf)
40. Install parking brake cable assy no.ii
- Install the parking brake cablevision with the ii bolts.
Torque: 5.4 Nvm (55 kgfvcm, 48 in.Vlbf)
41. Install fuel tank protector no.1
- Install the fuel tank protector with the 5 bolts.
Torque: 5.four Nvm (55 kgfvcm, 48 in.Vlbf)
42. Install exhaust pipe assy front
- Using vernier calipers, measure the free length of the compression spring.
Complimentary length:
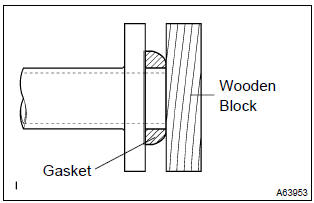
front side 43mm (1.6929 In.) Rear side 40mm (i.5748 In.) - using a hammer and wooden block, tap in a new gasket until its surface is flush with the exhaust manifold.
Detect
:
- tap in the gasket in the correct direction.
- Practise not reuse the removed gasket.
- Be certain non to button in the gasket by installing the exhaust pipe.
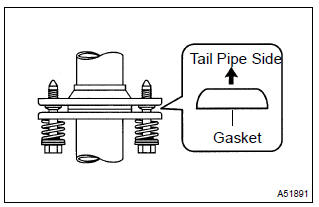
- Install a new gasket on the exhaust pipe (rear side).
- install the frazzle pipe with the 4 pinch springs and 4 bolts.
Torque: 43 nvm (440 kgfvcm, 32 ftvlbf)
- install the 2 exhaust pipe supports.
- connect the oxygen sensor connector.
- install the font floor carpet with a prune.
43. Install flooring panel brace front
- Install the floor console brace forepart with the 2 basics.
Torque: xxx nvm (302 kgfvcm, 22 ftvlbf)
44. Install fuel suction tube set gasket
45. Install fuel pump assembly
46. Install fuel tank vent tube set plate
47. Connect fuel emission tube sub�assy no.i
48. Connect fuel tank main tube sub�assy
49. Check fuel leak
50. Bank check frazzle gas leak
51. Install rear floor service hole cover
52. Install bench type rear seat absorber assy
Other materials:
Wiper rubber lh
Replacement i. Remove fr wiper bract lh remove the front wiper blade lh from the front wiper arm lh. Notice: do not fold down the front wiper arm with the front wiper bract being removed from it. 2. Remove wiper rubber lh remove the front wiper safe lh from the forepart wi ...
Inspection procedure
1 Bank check side squib(rh) circuit(airbag sensor assy centre � front seat airbag assy rh) Disconnect the negative (�) terminal cablevision from the bombardment, and wait at to the lowest degree for 90 seconds. disconnect the connectors between the airbag sensor assy center and the front seat airbag assy (rh ...
Inspection procedure
Hint: this dtc chart is on the premise that the engine is cranked normally. If the engine is not cranked, proceed to the problem symptoms table on page 05�42. Read freeze frame data using the manus-held tester or the obd ii browse tool. Freeze frame data records the engine atmospheric condition wh ...
Source: https://www.tcorolla.net/removal_amp_installation_and_disassembly_amp_re-1022.html
Posted by: thorntonxvier1937.blogspot.com
0 Response to "How To Change A Gas Tant On 1995 Corola"
Post a Comment